Course Maps & Descriptions
scroll to: course flyover / detailed descriptions
Course Maps
Click on a course map below to see the full size map in a pop-up window ... or follow the links below each map for different viewers.
21
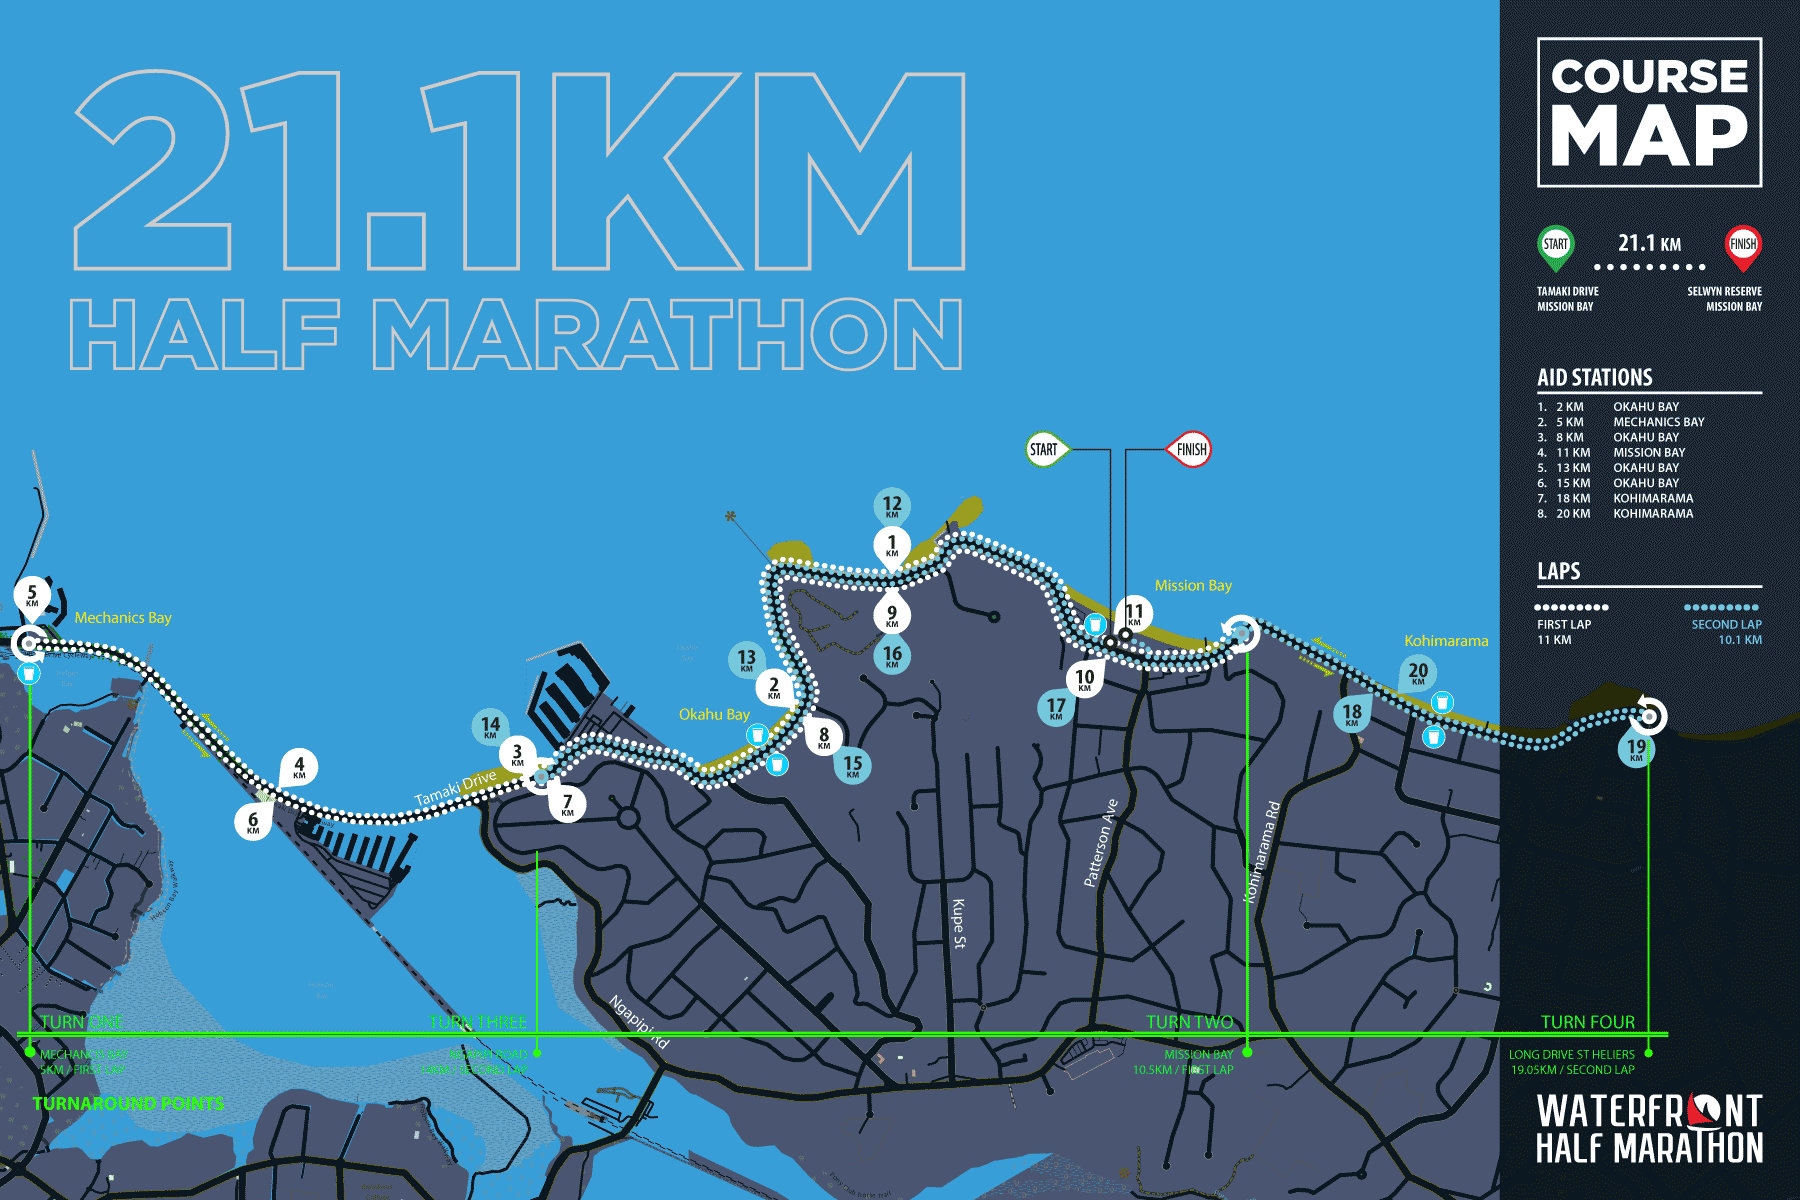
From St Heliers, follow Tamaki Drive through the Eastern beaches and join Quay St at Mechnics Bay. Run into Downtown Auckland on Quay St for a loop around The Cloud, Ferry Building and Te Kometitanga before heading back east. At Ngapipi Rd, a short out-and-back goes past the famous boat sheds before continuing east on Tamaki Drive to the finish line at Vellenoweth Green, St Heliers.
10
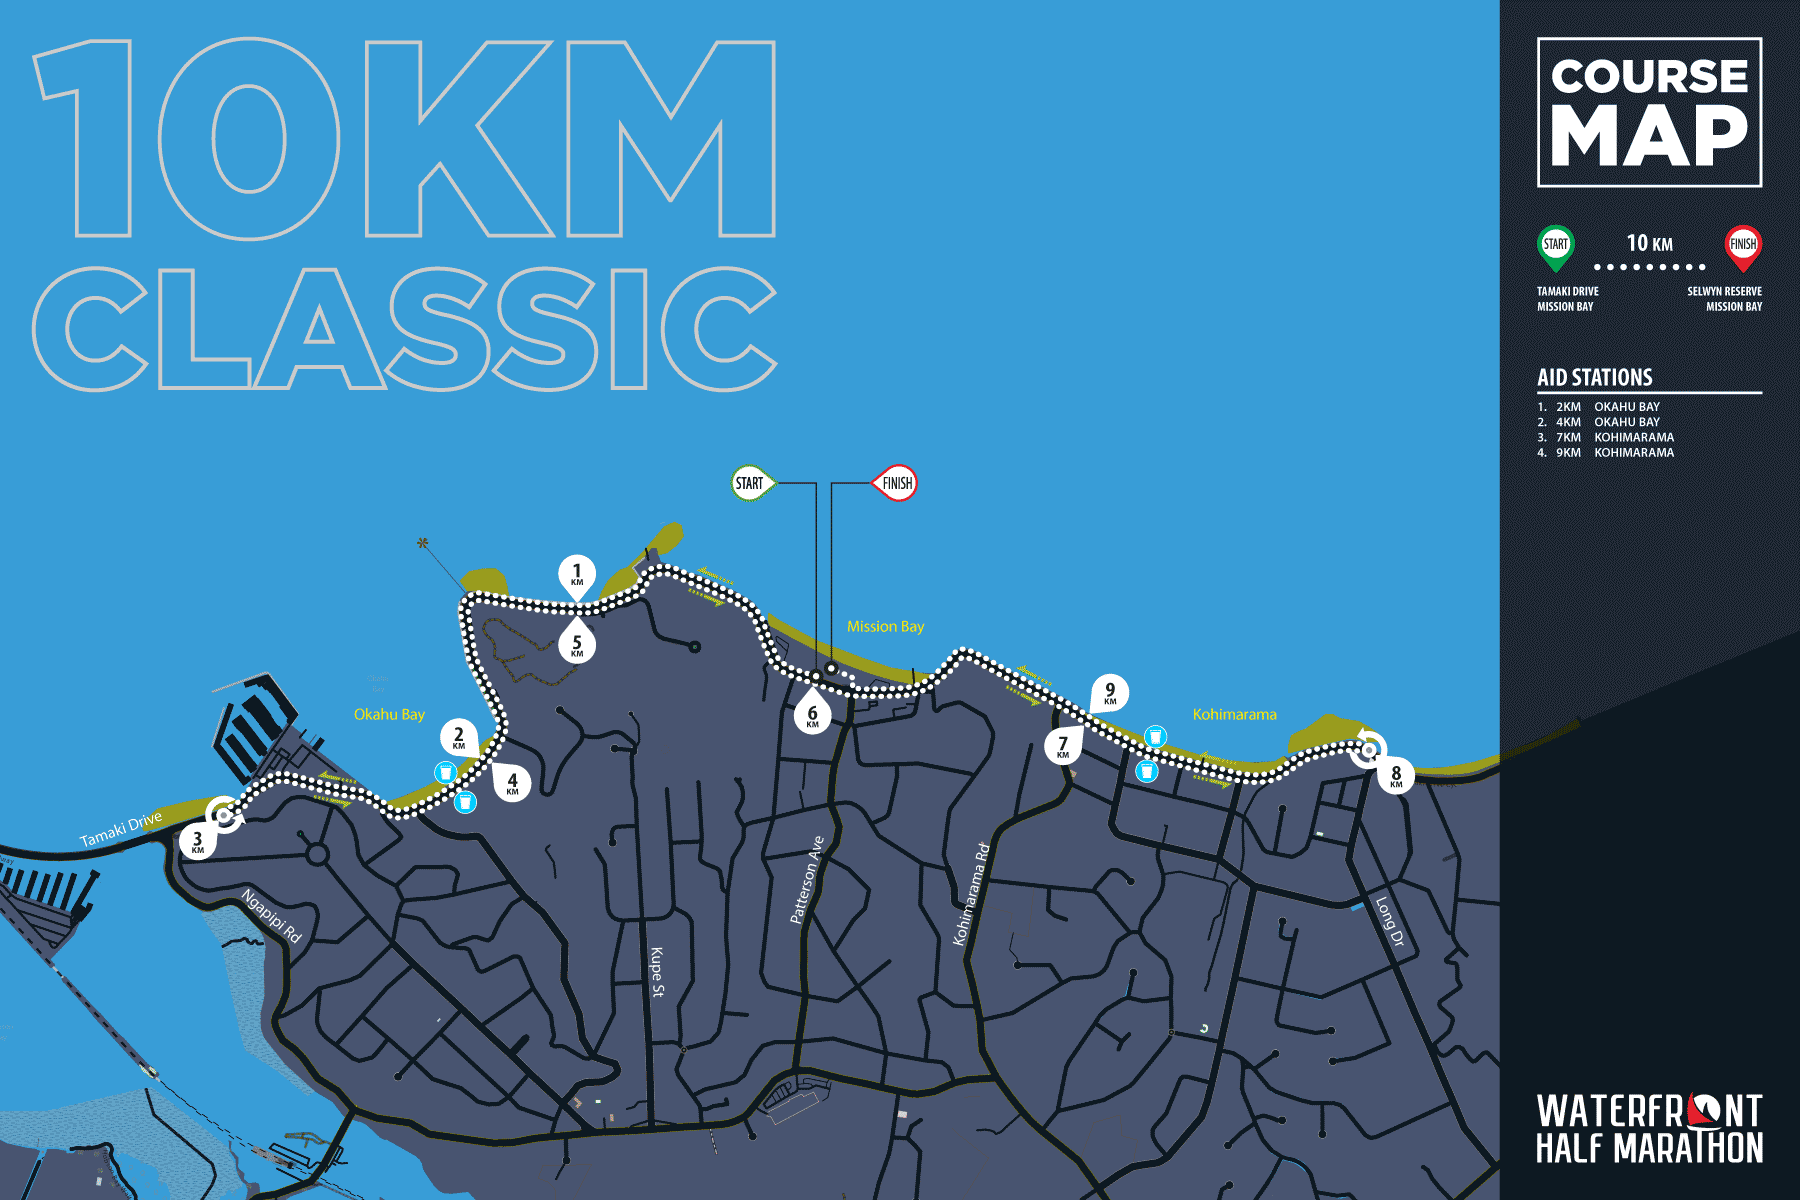
From St Heliers, follow Tamaki Drive past Kohimarama, Mission Bay and Okahu Bay. The turnaround point is right outside Ferg's Kayaks on the city side of Okahu Bay. After the turnaround, head straight back on Tamaki Drive to the finish line on Vellenoweth Green, St Heliers.
5
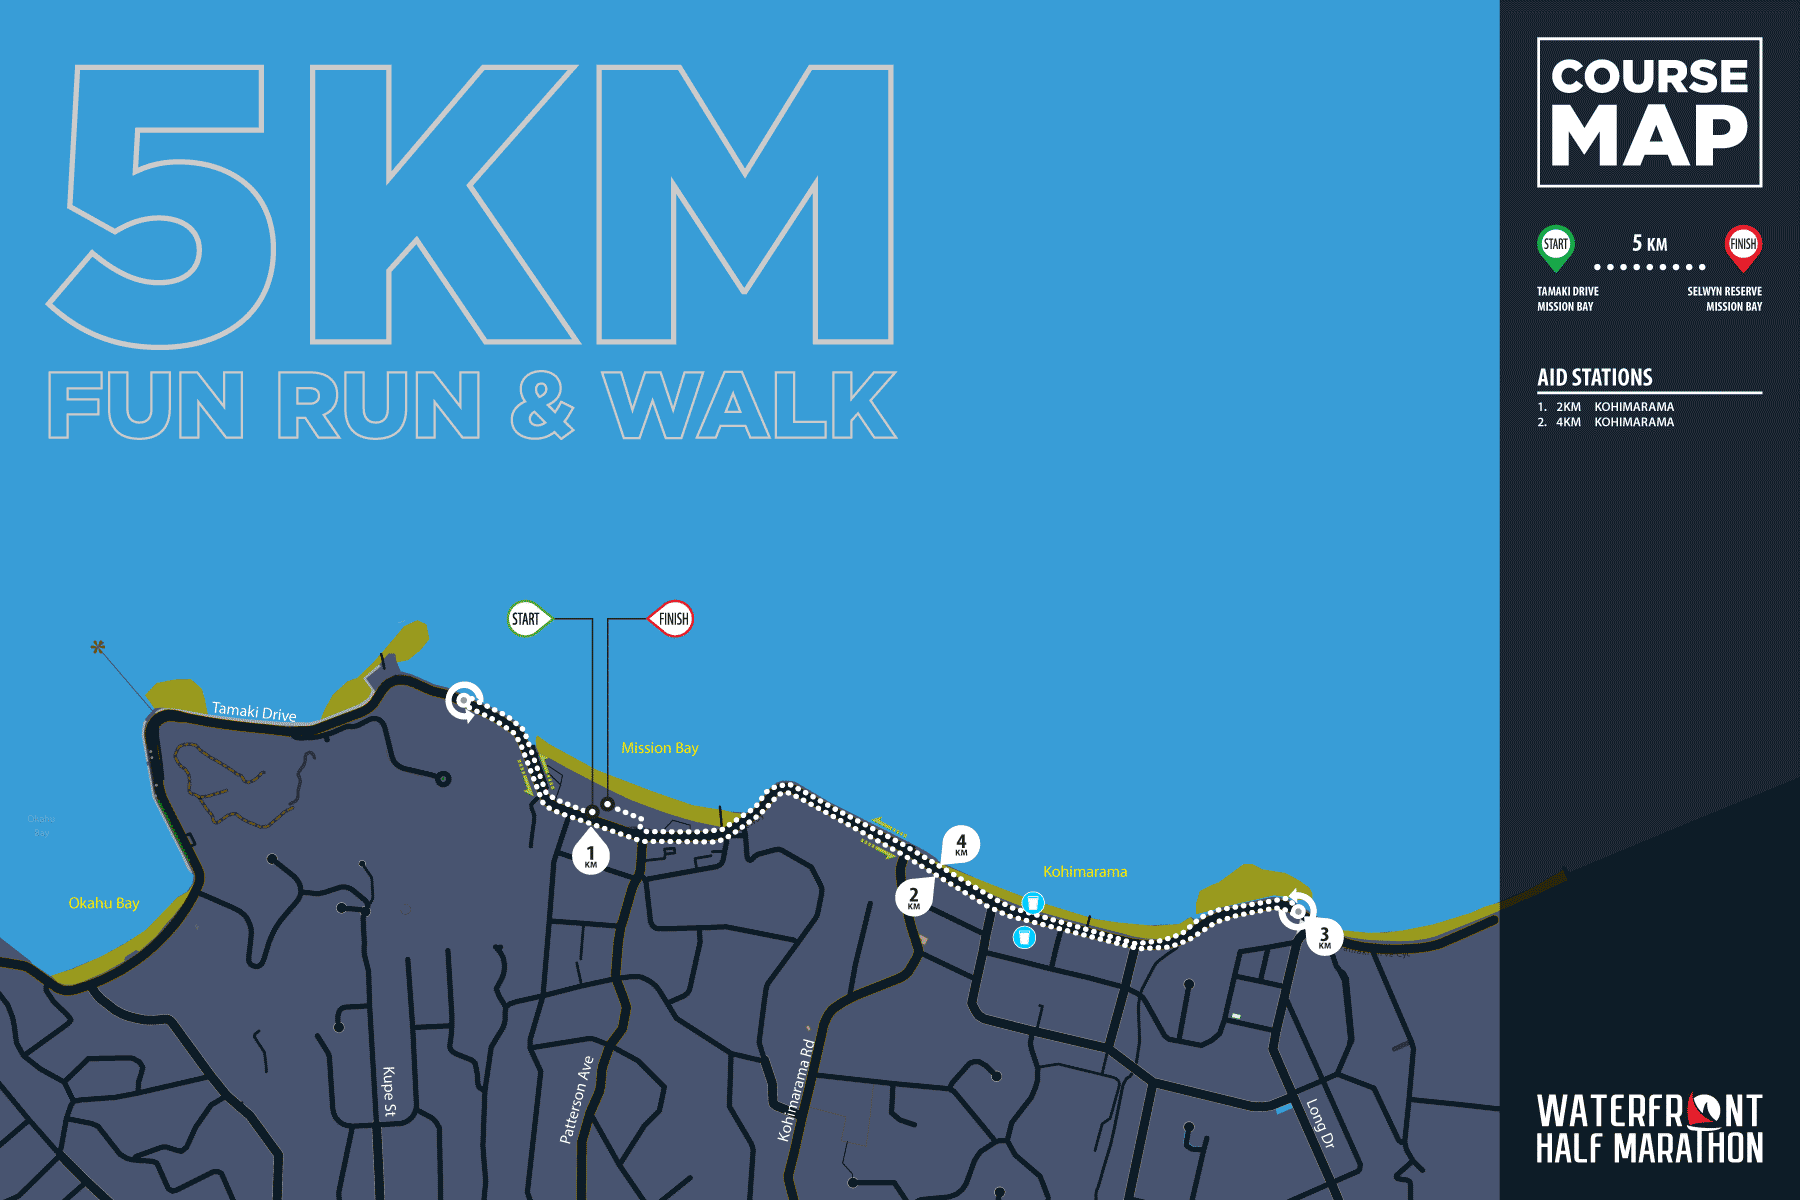
From St Heliers, take Tamaki Drive through Kohimarama and into Mission Bay. The turnaround point is just before the Misson Bay fountain and you'll find an aid station here too. Head back to the finish line on the landward side of Tamaki Drive to the finish line at Vellenoweth Green, St Heliers.
2
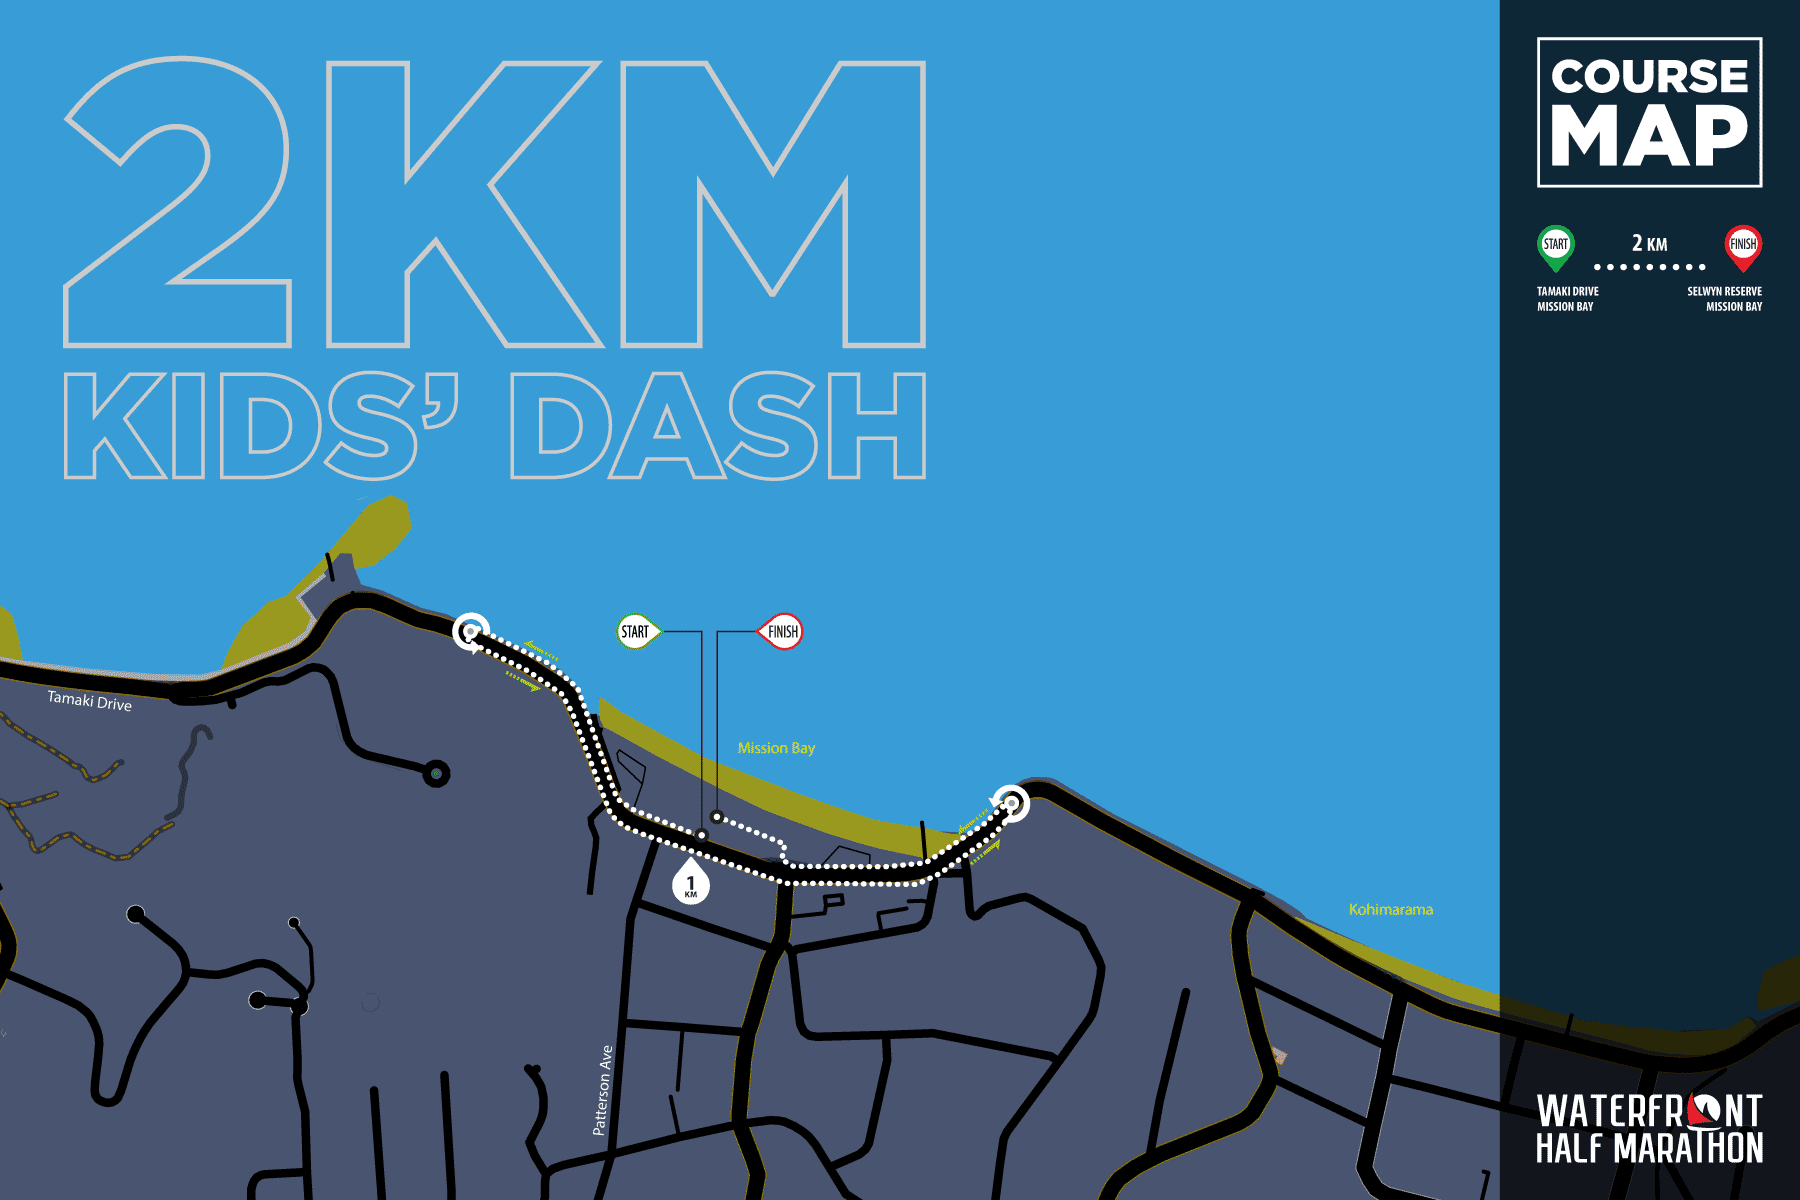
From St Heliers, it's an all-out, flat-tacker sprint around the corner to the big arch and turnaround just into Kohimarama. Turnaround and fire up the engines for the second half, all the way to the finish line at Vellenoweth Green, St Heliers.
FROM ST HELIERS TO DOWNTOWN AUCKLAND
Half Marathon Flyover
STEP BY STEP / TURN BY TURN
Detailed Course Descriptions
The Half Marathon course at the Waterfront Half Marathon can be broken down into three main sections; The Beaches, The Causeway and the Downtown Loop. On the return leg only, there is also the Ngapipi Boatsheds out-and-back. Here is how we put them together …
Important! This course has been officially measured and is World Athletics/AIMS Certified as accurate. [Certificate of Compliance]
KM 0 / The Start
The course starts on Tamaki Drive in the centre of St Heliers, near the junction with Goldie St and only a few metres from the main event venue and finish line. With the sun rising behind you and lighting up beautiful Waitemata Harbour and Rangitoto, it will be a spectacular sight to begin your half marathon journey.
Be sure to familiarise yourself with the start zones and assembly times so you’re in the right spot at the right time!
KM 0 -> KM 5 / The Beaches
A short section of Tamaki Drive takes you around the headland and into the high rise blocks and cafes of Kohimarama. The first band on course is opposite the Kohimarama Yacht Club and you’ll find the 1km arch shortly afterward. What? We’ve done a kilometre already? Caught short at the start? There’s a public toilet just past the 1k mark.
With almost 2km done, a sweeping turn around Pipimea Head opens up a spectacular view of Mission Bay and Bastion Point. Run past the Mission Bay shops and cafes and you’ll soon pass the famous Mission Bay Fountain – the finish line for the Waterfront Half Marathon from 2018-2025. Just past the fountain is the first aid station as well as a public toilet.
Leaving Mission Bay you’ll run around Bastion Point where you’ll find more live music to egg you on at Tamaki Yach Club. Rounding the point here, you are rewarded with the first spectacular views of downtown Auckland – yep, that’s where we’re heading! Onwards to the Okahu Bay Wharf and Kelly Tarltons on the next headland, with the 4km mark just around the corner. You’re now on your way into Okahu Bay with an aid station and toilet in the middle of the bay.
Leaving Okahu Bay, you’ll run under the 5km arch opposite famous Ferg’s Kayaks. One quarter done!
KM 5 -> KM 7.5 / The Causeway
Tamaki Drive opens up leaving Okahu Bay and you’ll soon pass Ngapipi Rd and hit the arduous slopes of the Ngapipi Overbridge. Only kidding – the total elevation gain here is about the same as a box jump at the gym. You are now on the causeway – a beautiful ribbon of elevated road that separates Hobson Bay from the Waitemata Harbour.
Passing 6km, you’ll have moored boats from the Outboard Boating Club on your left whilst the Waitemata Harbour and North Head are on your right. Next stop is the Parnell overbridge which links Tamaki Drive to Parnell outdoor pool and you’ll find your next aid station here, as well as the 7km arch. Up ahead is Teal Park and the Marine Rescue Centre, base for the Auckland Rescue Helicopter.
Here we find the only elevation gain of any description on the whole course as the road rises to allow trains heading into the Port of Auckland to pass underneath. The reward for this short incline is the most spectacular view of the Downtown Auckland skyline, shining in the rising morning sun.
KM 8 -> KM 12 / Downtown Loop
Under the 8km arch with the Ports of Auckland “red fence” on your right, you’ll head into the city and pass Spark Arena on your left. Your are now on Quay St and city bound! The 9km mark is flanked by the Rainbow Warrior Memorial on the seaward side Les Mills Britomart on the landward side. This is about to get fun!
We’re now in the heart of Auckland City. Just before the Ferry Building, take a right through the big red gates and onto Queens Wharf. Follow the road between The Cloud and Shed 10 right to the end of the wharf and spectacular views of the inner harbour, North Shore and Harbour Bridge. Two left turns at the end of The Cloud will have you running back down the wharf on the western side of The Cloud and out onto Quay St.
A right turn onto Quay St takes you past the historic Ferry Building and up to the turnaround point just shy of Lower Albert St. Once past the Ferry Building again, a right turn with bring you into Te Komititanga, the new civic square in front of Britomart Station – once the old Post Office building. With a band playing and cheering spectators all around, take a victory lap of the square before heading back towards Quay St. You are now officially half way there.
A right turn back on Quay St begins your eastward journey back to St Heliers and the finish line.
KM 11 -> KM 14.3 / Heading Back East
Retrace your steps past Spark Arena and over the Parnell overpass. On the other side, run past Mechanics Bay and over the causeway – passing Lilliputt – to the Ngapipi Rd bridge.
KM 14.3 -> KM 15.3 / Ngapipi Boatsheds
Leaving the causeway, you run over the Ngapipi Rd bridge and take a right turn into Ngapipi Rd. This 1km long out-and-back is flat and fast and follows the edge of Whakataktaka Bay. Within the first 100 metres, you’ll pass the iconic Ngapipi Rd Boatsheds. Once used to store – y’know – boats, these historic structures are heritage protected and have been renovated into exclusive waterfront hangouts for the rich and famous. How exclusive? Recent sales have been in excess of $2million! Not bad for a building which is prohibited from being used as a residence!
Just before the flat section of Ngapipi Rd ends, you’ll hit the turnaround point outside #10. Head back towards Tamaki Drive and, on the way, you’ll pass under the 15km arch and timing point. Pretty much ¾ of the way there! Turn right onto Tamaki Drive and continue your journey towards St Heliers.
KM 15.3 -> KM 21 / The Run Home
Retrace your steps through Okahu Bay, Mission Bay, Kohimarama and finally into St Heliers.
KM 21.1 / The Finish
Right after passing the final on course live entertainment at the eastern end of Kohimarama, you’ll round the corner into St Heliers and hear the call of the finish line. Stay on Tamaki Drive until the final turn off the road and onto the grass (watch your step and keep your concentration as you negotiate the transition from road to reserve). The finish line is ahead of you with cheering spectators lining the chute. Your approach to the finish is perfectly framed with Rangitoto Island behind for the best finish line photo ever.
Get your hands in the air! You made it!
The 10k course at the Waterfront Half Marathon is a perfectly flat, stunningly scenic out-and-back blast along Tamaki Drive. Here is how it fits together …
Important! This course has been officially measured and is World Athletics/AIMS Certified as accurate. [Certificate of Compliance]
The Start
The course starts on Tamaki Drive in the centre of St Heliers, near the junction with Goldie St and only a few metres from the main event venue and finish line. Get ready for maximum excitement as the gun goes and you head west with the sun sparkling against the Waitemata Harbour on your right.
Kohimarama
A short section of Tamaki Drive takes you around the headland and into the high rise blocks and cafes of Kohimarama. The first band on course is opposite the Kohimarama Yacht Club and you’ll find the 1km arch shortly afterward. What? We’ve done a kilometre already? Caught short at the start? There’s a public toilet just past the 1k mark.
Mission Bay
With almost 2km done, a sweeping turn around Pipimea Head opens up a spectacular view of Mission Bay and Bastion Point. Run past the Mission Bay shops and cafes and you’ll soon pass the famous Mission Bay Fountain – the finish line for the Waterfront Half Marathon from 2018-2025. Just past the fountain is the first aid station as well as a public toilet.
Bastion Point
Leaving Mission Bay you’ll run around Bastion Point where you’ll find more live music to egg you on at Tamaki Yach Club. Rounding the point here, you are rewarded with a spectacular view of downtown Auckland!
Okahu Bay
Onwards to the Okahu Bay Wharf and Kelly Tarltons on the next headland, with the 4km mark just around the corner. You’re now on your way into Okahu Bay with an aid station and toilet in the middle of the bay.The Turnaround
On the city side of Okahu Bay, right opposite famous Ferg’s Kayaks, you’ll hit the turnaround point. 5k in the bag. 5k to go! As you make the 180, you’ll be filtered in with half marathoners heading back from the city. Hey team … we’re all in this together now!
The Way Home
Retrace your steps through Okahu Bay, Mission Bay, Kohimarama and finally into St Heliers.
The Finish
Right after passing the final on course live entertainment at the eastern end of Kohimarama, you’ll round the corner into St Heliers and hear the call of the finish line. Stay on Tamaki Drive until the final turn off the road and onto the grass (watch your step and keep your concentration as you negotiate the transition from road to reserve). The finish line is ahead of you with cheering spectators lining the chute. Your approach to the finish is perfectly framed with Rangitoto Island behind for the best finish line photo ever.
Get your hands in the air! You made it!
The 5k course at the Waterfront Half Marathon is a perfectly flat, stunningly scenic out-and-back blast along Tamaki Drive. Here is how it fits together …
The Start
The course starts on Tamaki Drive in the centre of St Heliers, near the junction with Goldie St and only a few metres from the main event venue and finish line. Get ready for maximum excitement as the gun goes and you head west with the sun sparkling against the Waitemata Harbour on your right.
Kohimarama
A short section of Tamaki Drive takes you around the headland and into the high rise blocks and cafes of Kohimarama. The first band on course is opposite the Kohimarama Yacht Club and you’ll find the 1km arch shortly afterward. What? We’ve done a kilometre already? Caught short at the start? There’s a public toilet just past the 1k mark.
Mission Bay
With almost 2km done, a sweeping turn around Pipimea Head opens up a spectacular view of Mission Bay and Bastion Point. Run past the Mission Bay shops and cafes and you’ll find plenty of support from the patrons enjoying the view … encourage them to get involved next time!
The Turnaround
Once past the cafes, you’ll see the famous Mission Bay fountain coming up on your right. That marks the spot where you’ll hit the turnaround marker. Half done, half to go! Right after making the turnaround, you’ll also come upon your aid station. Stock up and get ready for the return.
The Way Home
Retrace your steps through Mission Bay, Kohimarama and finally into St Heliers.
The Finish
Right after passing the final on course live entertainment at the eastern end of Kohimarama, you’ll round the corner into St Heliers and hear the call of the finish line. Stay on Tamaki Drive until the final turn off the road and onto the grass (watch your step and keep your concentration as you negotiate the transition from road to reserve). The finish line is ahead of you with cheering spectators lining the chute. Your approach to the finish is perfectly framed with Rangitoto Island behind for the best finish line photo ever.
Get your hands in the air! You made it!
Kids … fire up your engines and let’s get going on a 1k out, 1k back blast along the Auckland Waterfront. Here is how it fits together …
The Start
The course starts on Tamaki Drive in the centre of St Heliers, near the junction with Goldie St and only a few metres from the main event venue and finish line. Get ready for maximum excitement as the gun goes and the adults go MENTAL cheering you on!
Kohimarama
A short section of Tamaki Drive takes you around the headland and into Kohimarama. There’s a band on course, opposite the Kohimarama Yacht Club and you’ll get to hear them on the way out and on the way back!
The Turnaround
Just up ahead, you’ll see the gigantic 1km arch across the road. As soon as you get there, run around the Turnaround marker and head back the way you came. Half way done, half way to go!
The Finish
Right after passing the final on course live entertainment at the eastern end of Kohimarama, you’ll round the corner into St Heliers and hear the call of the finish line. Stay on Tamaki Drive until the final turn off the road and onto the grass (watch your step and keep your concentration as you negotiate the transition from road to reserve). The finish line is ahead of you with cheering spectators lining the chute. Your approach to the finish is perfectly framed with Rangitoto Island behind for the best finish line photo ever.